Posted on Leave a comment

Fused Glass Floral Bowl

I’m a member of two art collectives and both of them have themes for artists to work towards. The Gallery Mt Macedon set a theme of flora and fauna for the month of March. I’ve made floral bowls and plates before but decided to do a slightly different take for my design this time. I started by cutting a 40cm circle from clear glass. This was cleaned and then placed onto my kiln shelf. I prefer to work directly onto a kiln shelf. Powder green frit (fine particles of glass) was sprinkled around the inner circle to represent grass. Power blue frit was then sprinkled on the remainder of the glass to represent sky. This was then placed into my kiln for an initial firing. Whilst I could have built my design directly onto the frit, I didn’t want to risk moving the frit if I accidentally placed a decorative element in the wrong spot.

After the initially firing, I began my decoration process. The green frit might look bright but most of it will be covered with coarser pieces of frit. Some of my design elements had been made previously – the large flower centres, the toadstools, small orange petals and dots for other flowers. The finer stems for the flowers were stringers (fine spaghetti like pieces of glass) that I made in the flame. You can purchase commercially made stringer but I wanted something that wasn’t perfectly straight.

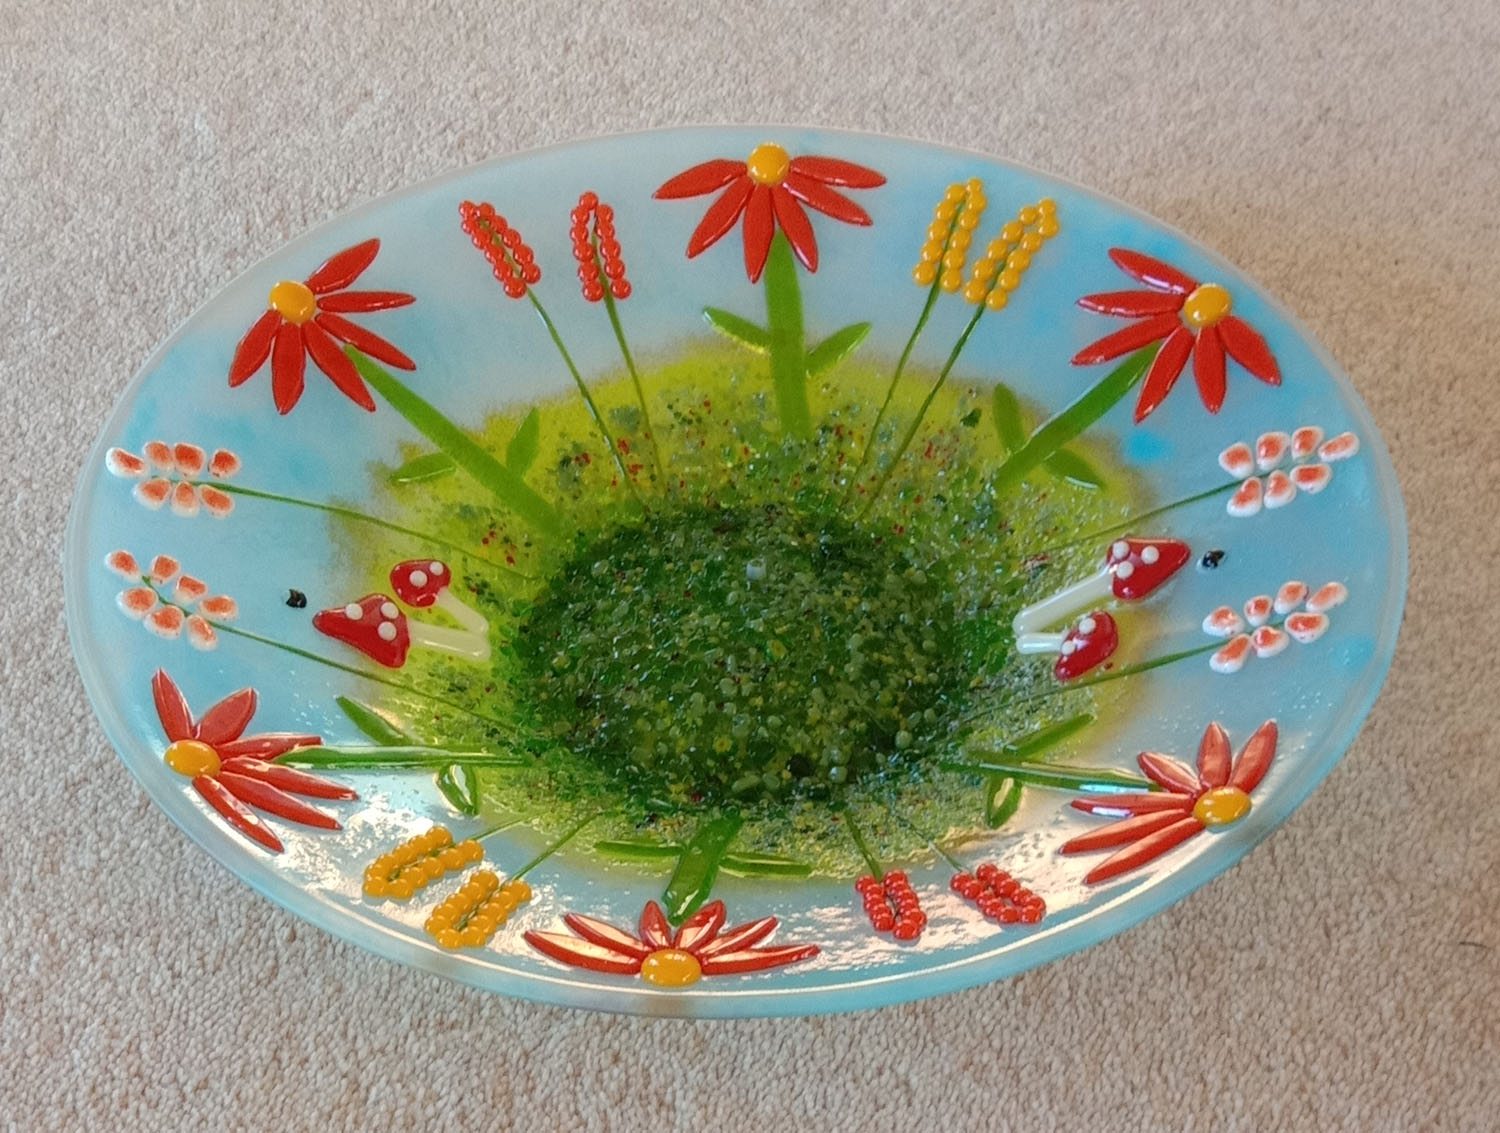
I just lay down pieces until I’m happy with the design. More flowers were added. The centre was filled using a mixture of different size and coloured frit. All the ends of the flower stems were covered up. Two butterflies can also be found flitting about above the toadstools. I found these butterflies on the internet and they’re part of my stash – to be used sparingly.

A little bit of transparent blue and clear frit was also sprinkled on the sky to add a little definition. Then it was back into the kiln for a tack fuse firing as I wanted the decorations to still have some definition.

Here’s the finished piece. Lovely and tactile. It’s amazing how many people stroke a piece of glass.

Posted on Leave a comment

Puddles and reactions in glass

I like to make components for my glass work, sometimes it’s dots and sometimes other things like glass puddles. Glass puddles are where you layer pieces of glass into a stack and then full fuse them. No matter how high the stack, if you use a full fuse schedule in your kiln and don’t dam the piece, the glass evens out to 6mm high. I layered several pieces of bullseye’s blue and french vanilla glass together because I know these colours react together and create wonderful effects. I forgot to take a picture of my fused stack until it had fused and I’d already started chopping it. You can see the layers of glass below. The first piece shows the bottom of the glass whereas the second piece is top facing upwards. It has a rounded surface.

Once you have a single piece of glass, you then chop it up and lay the glass on its edge. I used mosaic nippers to chop my glass into small pieces. It took quick a bit of effort as 6mm glass is thick and hard to chop. The pieces are then returned to the kiln to fuse again, creating puddles of colour.

The photo below shows the same pieces once they have been fully fused. Now you can see why they are called puddles. You can see how the blues and french vanilla reacted together, creating dark lines where they meet. There are also lots of random wavy lines throughout and each piece has nicely rounded edges.

Now it’s time to layout my piece. I used a clear based completely covered with a piece of transparent turquoise glass. I then proceeded to lay down my puddles until I was happy with their placement. French vanilla dots were placed in between the waves of puddles. The piece then went back into my kiln on a full fuse temperature to make it into one smooth piece.

Once fully fused, I washed the piece before placing it on a mold and returning it to my kiln for a slump firing at a slightly lower temperature. The glass slumped into the mold creating a plate.

You can see all the lovely reactions between all the glass. If I ever did this sort of design again, it would be totally different as all puddles are slightly different. There are so many possibilities too. You can take two similar size puddles and turn them into earrings. You can make bigger puddles by chopping larger pieces from your piece and turn them into pendants. You can make puddles in lots of other colours.

Posted on Leave a comment

‘Tis The Season

Christmas is fast approaching. It will be here before we know it. For an artist, Christmas preparation starts much earlier in the year in order to have enough stock for people to purchase.

Last year was the first year I started making porcelain Christmas decorations. My decorations are fairly easy to make but can be time consuming. Firstly I roll out my porcelain until it is the desired thickness. The porcelain is then textured on one side only either with special, decorative rolling pins, use texture mats, pieces of lace or anything that I think will leave a nice pattern on the porcelain. Then I’ll use various different cookie cutters for the desired shape. A hole is pierced into the top of the piece so a ribbon can be threaded through on completion.

The decorations are then sandwiched between two boards, whilst still wet, so they dry flat and aren’t warped. Sometime during the drying, I’ll clean up the edges of each decoration as the cookie cutter doesn’t leave a really smooth edge. I also make sure that the hole is all the way through the decoration. You can see that some of the pieces above are drying slightly quicker than others. Once all the decorations are completely dry to the touch, they’re bisque fired in my kiln. After that, they’re all set to be glazed with a clear, gloss glaze which is brushed on by hand.

The decorations above that have a slight greenish tinge have been glazed. Once fired, the tinge disappears and you’re left with a nice white piece. The stack of stars in the centre of the photo are waiting to be glazed. After the glaze is completely dry, it’s back into the kiln for the glaze firing. The final touch is adding a white ribbon to allow decorations to be hung.

You can find a small selection of my Christmas decorations on my website – https://fieldsofclover.com/?s=christmas&post_type=product

Posted on Leave a comment

Blue Fire Spirit – Decorative Glass Piece

Every winter a local gallery has an exhibition where artists from the area are invited to submit three pieces of any type of art. I decided to do something a little bit different (for me) and made a decorative piece which allows the light to shine through.

I began with a clear piece of glass onto which I laid randomly cut pieces of blue glass. There are actually three different colours of blue glass – cobalt, turquoise and cyan. The clear glass only went up about three quarters of the piece as I wanted the blue wavy bits of glass at the top to be free standing. Where there was no clear glass to support the blue glass, I placed kiln paper behind the blue glass so that this glass would all be at the same level.

Once I was happy with the blue wavy strips of glass, I added clear dots and the occasional teal dot. When light shines through the back of the glass, you get a lovely pattern reflected.

The piece then went into my kiln to be tack fused together. I chose a tack fuse so that the glass would still have definition.

Once out of the kiln, the piece was thoroughly washed before being placed in a wooden stand. Then it was off to the Castlemaine Market Building in Central Victoria.

Posted on Leave a comment

Working with reactive glass

With time on my hands, I’ve been experimenting with reactive effects in glass. I use Bullseye Glass for fusing. When certain glasses are combined in the kiln, their chemistries have the potential to react, which can cause beautiful effects. Bullseye have charts on their website showing the reactive potential of their glasses. It’s all to do with whether the glass is lead bearing, copper bearing or sulfur/selenium bearing and how you combine the different types of glass.

I followed one of Bullseye’s quick tips where I used french vanilla glass (one of my favourites) and laid silver foil on it in random strips. Luckily I had some silver foil handy in my lampworking supplies. The quick tip suggested using aquamarine frit (tiny pieces of glass) but I didn’t have any so I substituted it with turquoise frit. The frit was sprinkled on the bottom of the silver foil and plate. That was all the quick tip suggested. I then added french vanilla stringer (thin, spaghetti like pieces of glass) laid vertically on the silver foil and french vanilla sheet. Clear dots were also placed randomly around the silver foil .

I usually build all my pieces directly onto the kiln shelf. The picture above shows the assembled piece ready for firing. The picture below is after full fuse firing and then slumping. You can clearly see the reactions. I see candles which wasn’t intentional. So many possibilities….

Posted on Leave a comment

Patchwork Plates

Patchwork plates are fun to make. I’ve been making them for several years now. I pick a colour palette and then make up my design. Each design is different – it all depends on what glass I have available and whether I’m cutting the glass into squares, rectangles or triangles. The green patchwork plate has just come out of the kiln. I decided to work in triangles.

I laid down all my triangles on a clear piece of glass making sure that no triangles that touched were the same colour. Five different greens were used as well as French Vanilla. There are a few slight gaps between some of the triangles. The gaps will close up when fused. After laying down all the triangles, I began to decorate each triangle using stringers and dots that have previously been made on spare kiln shelf.

The photo above has been taken after a full fuse. I tried to decorate each triangle differently. Some of the greens reacted with the French Vanilla which I think adds depth to the piece. Once cleaned, the piece was returned to the kiln for slumping.

Below are a few variations of a patchwork plate that I have made over the years.

Posted on Leave a comment

Fused Glass Splat Plate

I’ve been making this type of plate for about 10 years. I’ve always called them a ‘splat’ plate though some glass artists call a similar design a ‘coral’ plate. I think the biggest difference between the two is that I slump my fused piece into a mold whereas coral plates are generally draped over a mold.

I like to use a lot of clear glass and transparent glass to let the light shine through though I do use a bit of opaque glass too. After choosing a colour palette, I cut the glass into strips then lay them down in a pattern, with plenty of gaps, directly onto my prepared kiln shelf. Mostly, I do a circle design. Then the piece goes into the kiln to fuse together.

When my design has been fused, I wash the piece then place it back in the kiln on top of a mold for it to slump into. Here, I actually have two different sized molds stacked in my kiln – both have the same colour scheme but each piece will be unique as I can never lay down the pieces of glass in the exact same order.

Here’s the finished piece that was in the top mold in the kiln. I love the vibrancy of the green.

Below is a different colour combination that I made sometime ago.

Posted on Leave a comment

Fused Glass Bubble Plate

When working with layers of glass, one of the things an artist tries to avoid is air being trapped between the layers which then cause unsightly bubbles. For this plate, trapped bubbles are a design element.

I cut two pieces of clear glass the same size. On each piece, I layered coloured stringers (thin pieces of glass, like spaghetti width) at set intervals and glued them down. Below, you can see one of the pieces being built on my kiln shelf.

When the glue was dry, I took the second piece, carefully flipped it upside down and turned it at a 90 degree angle before placing it on the first piece. The stringers were sandwiched between the two pieces of clear glass. This then went into my kiln for a full fuse.

You can clearly see the bubbles trapped in between the rows of stringer. Most of the bubbles are centred but there are a few that are off centre and a couple of squares have to bubbles. I really wanted a rainbow effect. Unfortunately a couple of the stringer colours I chose were in light shades and didn’t quite have the vibrant effect I was after. Next time, I’ll use a different colour palette.

Then the piece went back into the kiln to be slumped into a dish shape. Overall, I was pleased with the result.

Posted on Leave a comment

Bullseye Striker Glass

I use Bullseye Glass for fusing. Some of their glass is known as ‘striker’ glass. In sheet form, this glass can appear pale or colourless. It matures to a much different colour when fired. On the piece I am making below, the bottom sheet of ‘clear’ glass and the top small ‘clear’ pieces are actually striking glass, in this case, an orange. The in between layer is french vanilla, one of my favourites.

When working on a design, you have to remember that some colours can strike so what you are seeing in front of you, is not the same colour the piece will be fired to. Also, it’s important to keep your striking glass separate from your clear glass so that you don’t accidentally use the wrong glass.

After the initial kiln fusing, the glass has struck and you can see its true colour. Then it’s back into the kiln to slump into a bowl mold.

Posted on Leave a comment

Making a Fused Daisy Plate

I often make daisy plates and thought I would take photos at each step of the way.  These plates make me feel happy when I’m making them – they just look so nice and bright. This plate is 30cm square and the plate has a slight curve to it.

Making a plate is a two step process.  First you fuse your design into one piece.  The piece is then washed and placed onto a mould to slump into shape.  Fusing and slumping require different temperatures. To try to fuse and slump at the same time will distort the pattern.

When glass is heated, it likes to be 6mm thick.  If the glass isn’t 6mm thick, it pulls slightly at the edges. As most fusing glass is 3mm thick, many glass artists insist that you need two full layers of glass in order to make anything.  I disagree and use the pulling effect to my advantage.  Where the glass has pulled in (gaps between the green squares), you can see a slight scalloped edge which I find quite pretty.

To start, I cut a 30cm piece of clear glass.  I like to work directly on my kiln shelf and then carry the shelf to the kiln.  I find that if I make the piece directly onto my workbench, when I carry the piece to the kiln, sometimes pieces can get knocked distorting the pattern.  I also use thinfire paper, which stops the glass sticking to the kiln shelf and gives a nice smooth finish to the back of the plate.

My next step is making a border.  I sometimes use small squares, triangles or even circles depending on the look I’m after. Next I start cutting petals.  After cutting the petals, I’ll spend a little time grinding off any sharp edges or obvious bumps.  The centre of each daisy is made from little circles that I have made in the kiln previously when there has been spare space on the kiln shelf.

Now it’s time to fill in the background.  In this plate, I cut leaves out of the same transparent green glass as the border and place them in random directions. All those little leaves are very time consuming.

Often I will just grab some frit and sprinkle that on the background of my daisy plates.  Frit is tiny pieces of glass.  You can grind your own glass or buy it ready ground in jars.  I usually grab a few different colours and mix it up in a zip lock bag before sprinkling it on my design.  It’s much quicker to do than cutting leaves.

Once I’m happy with my design, it goes into the kiln to be fused into one piece. I also use the left over kiln space for smaller items, such as earrings or dots for future daisies.

Everything is washed and my design is placed back in the kiln for slumping into shape.  Now it’s ready to find a new home.